Saturday, October 31, 2015

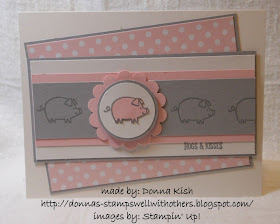
Barnyard Babies Hogs and Kisses

Now for something a little different.  We've been doing Halloween, Fall and Christmas, so I thought I'd break it up a bit with something soft and different.

I spotted this concept on Brian King's Blog and fell in love with the Hogs and Kisses as much as the colors.  I believe Brian used Blushing Bride and Basic Gray, but I wanted Pink Pirouette and Smoky Slate.


Both cards start with a Whisper White Thick Cardstock (140272) 
Base - 8 1/2" x 5 1/2" scored at 4 1/4"
The "dotted" layer is also the same sizes on both:
  Smoky Slate - 4 3/4" x 3 1/2" 
  Subtles Color Collection Pink Pirouette Dots (138437) - 4 5/8" x 3 3/8"

The rest of the Recipe for 3 piggy card above.

Smoky Slate - 4 3/8" x 2 3/8"
Whisper White - 4 1/4" x 2 1/4
Pink Pirouette - 4 1/4" x 1 5/8"
Smoky Slate - 4 1/4" x 1 1/4"


Remaining Recipe for 3 1/2 piggy card above:

Smoky Slate - 5 1/8" x 2 3/8"
Whisper White - 5" x 2 1/4
Pink Pirouette - 5" x 1 5/8"
Smoky Slate - 5" x 1 1/4"


Using Smoky Slate ink, stamp the piggy onto Whisper White cardstock and stamp again onto Pink Pirouette cardstock.

Punch the white piggy with the 1 1/4" Circle Punch and Fussy Cut the Pink Piggy - you will cut off his pink piggy tail but it will line up with the white one when you glue it down.

1 1/4" Circle Punch - Whisper White 
1 3/4" Scallop Circle - Pink Pirouette
1 3/8" Circle Punch - Smoky Slate


I like the 3 piggy card best.  I didn't like stamping a half of a pig on the first attempt! 


Thank you for looking in today - have a safe Halloween tonight and don't let the little goblins eat too much candy!

~ Donna

To see the items used, click the links below.  If you are reading this in an email, then go to my blog to see the scrolling list.


Built for Free Using: My Stampin Blog

Friday, October 30, 2015

Red Foil Ornament

I think this is one of the prettiest cards we made last weekend.  Elegant and actually very simple.


Base:  Very Vanilla - 11" x 4 1/4" scored at 5 1/2"
Top Layer:  Very Vanilla - 5 1/4" x 4"
Ornament: Delicate Ornament Thinlits Dies (139667)
Under the Ornament:  Red Foil Sheets (139607)
Ornament Top:  Gold Foil Sheets (132622)

Ribbon: 
   Gold Cording Trim (139618)
   1/8" Gold Ribbon (134583)

Sentiment Stamps:
  Versatile Christmas - inside (w-140389 / c-140392)
  Happy Scenes - outside (139821)
   

Add some dimensionals to pop up the top layer and you have a beautiful Christmas Card, easy for mass production.  Don't forget the glue dots for attaching your ribbon bow.


Thank you for looking in today ~ Happy Friday!

~ Donna

Thursday, October 29, 2015

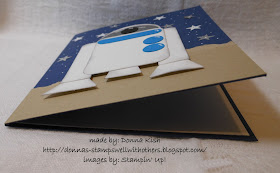
R2D2 Birthday Celebration

I love special order cards, especially when I can come up with something that works and makes me smile!  I know the little guy getting this will get a kick out of it too!


The body is 2 1/2" tall and 1 7/8" wide.
The head is from the 1 3/4" Circle Punch in Whisper White and Basic Gray.  I trimmed the Gray just a tad so it would fit "inside" the Whisper White circle.
The arms are 2 1/2" x 5/8" and rounded across the top.
The "feet" I just free-handed to match the width of the legs and then trimmed them at an angle to make a bit of a triangle look.
The blue is Pacific Point using the Word Window Punch and 1/2" circle punch.  The black circle on the face is also from the 1/2" circle punch.


Thank you for looking in today.  Can you believe it's Thursday already?  Halloween will be here this weekend and we've not bought our candy yet.  Yikes!  Better get to Costco soon!

~ Donna


Wednesday, October 28, 2015

Painting with Bleach

I tried this technique almost three years ago now and haven't tried it again until our Team Meeting this week.  I'd forgotten how fun and beautiful this can be.  If you missed the first attempt, click HERE to see it.

This was our quick Make & Take from our team meeting on Monday night.  

Crushed Curry - 8 1/2" x 5 1/2" scored at 4 1/4"
Basic Black - 5 1/4" x 4"
Soft Suede - 5" x 3 3/4"

The Soft Suede is stamped and embossed with Basic Black embossing powder and then painted in some areas with bleach.  YES, I said bleach!  Just add basic bleach to your Aqua Painter and gently paint the areas you want to lighten.


Each cardstock will give you a different lighter color, so be sure to experiment first and be absolutely sure you have some newspaper and paper towels under the cardstock you "paint" onto.

Also, before you assemble your dried / painted card, remove the newspaper and paper towels so you don't lay your fresh cardstock in or on the bleach and ruin something you don't want bleached.


Thank you for looking in today!

~ Donna


Built for Free Using: My Stampin Blog

Tuesday, October 27, 2015

My October Swap Card

Once a month our weSTAMP team meets for stamping and swapping.  Everyone votes on the card they like the best.  This week's cards were all very good.  I was impressed by them all.

I'm excited to share that my card won this month.  I was so happy!  

Here is my card.  I really had fun making these.  A little time consuming, but so worth it for the cuteness factor!


Santa may look kind of small for this fireplace, but I decided to think of the fireplace as being one of those really big GIANT fireplaces instead!  

Thank you for looking in today.  

~ Donna

Monday, October 26, 2015

Happy Winter

Here's another cute card from Saturday.  I've often stayed away from square cards, except for my little 3 x 3 thank you notes when I deliver workshop orders.

Most of them seem to be 5 x 5 cards which cost extra to mail, so I've just decided not to bother, but this card is 4 1/4" x 4 1/4" so it fits in the standard A2 envelope.  Why didn't I think of that?  LOL


Recipe:  

Base Card: Crumb Cake - 8 1/2" x 4 1/4" scored at 4 1/4"
Top Layer: Crumb Cake - 4" x 4"
Snowman Square: Crumb Cake - 1" x 1"
Dotted Layer:  Crumb Cake - 1 1/4" x 1 1/4"

Snowman:  White Christmas (135767)
Sentiment:  Happy Scenes (139821

Cherry Cobbler Bakers Twine
Dazzling Diamonds
Glue Pen
Stampin' Dimensionals
Stampin' Trimmer


Thank you for looking in today.  Tomorrow I'll share the card I made for our Team Swap I'll be doing later tonight at our Team Meeting.  

If you'd like to join my Stamps Well With Other's Team, I'd love to have you.  If you're in the Phoenix area, we have monthly team meetings and if you're out of state, that's okay too, we have team members in California and Colorado!  Let me know if you have any questions.

Happy Monday!

~ Donna

Sunday, October 25, 2015

No Peeking!

On Saturday, my Upline, Lorri Heiling, held her 4th Annual Holiday Extravaganza and it was fabulous, as always!

Over the next few days I'll be showing some of the great things we made.

Here is one that is so fast and easy, you'll be making them by the dozens!  The best thing about this card, it can be used year round with a different sentiments and papers.  Birthday, Baby Shower, Wedding Shower, so many things!


On to the details:

Begin with Whisper White Thick card stock: 8 1/2" x 5 1/2", scored at 4 1/4"
Layer - Real Red: 5" x 3 3/4"
Whisper White card stock:  4 7/8" x 3 5/8"
Designer Series Paper Stack:  Merry Moments (139595):  1 1/2" x 1 1/8"

Silver Cording Trim (139620): 3" lengths
Tissue Paper: 2" squares
Liquid Tombo Glue
Stampin' Dimensionals

Stamps:  Oh, What Fun (140386), Versatile Christmas (wood mount 140389 / 140392 clear mount)
Ink:  Real Red

Thank you for looking in.  To purchase anything you see here on the blog, click any item in the scroll below.  If reading this in an email, please go to the blog for a clickable link.

Have a Blessed Sunday!

~ Donna

Built for Free Using: My Stampin Blog

Friday, October 23, 2015

Last Day Today!


Don't miss this fabulous Stamp Sale!!!  Today is the last day you can order and receive 15% off your purchase!

If you purchase today - use Hostess Code DPH7K7DX and my November Hostess Kathy can receive credit for her party.  Be sure to allow me to see your information and if you are a new customer of mine, I will send you an additional thank you!

Shop Now before this sale is over!

Have a GREAT weekend!  I know I will, I'll be stamping with my weSTAMP team at Lorri's Holiday Extravaganza!  Can't Wait!

~ Donna

Thursday, October 22, 2015

Vellum Snowflakes

I'm really enjoying playing with the Sleigh Ride Edgelits in the Holiday Mini Catalog.  So many options and so little time!  

Combine with Holidays Fancy Foil Designer Vellum and you have a beautiful card.


With the vellum, you can use both sides for two different effects.  One side with the silver up is beautiful and the way it was designed.


Flip it over with the silver side down and the snowflakes are white.  Also beautiful!


Remember, since vellum shows where you place your glue, glue dots or any adhesive, be sure to cover the dot with bling.  The snowflakes are perfect for this!


Which way do you do your vellum?

White?


or Silver?

Thank you for looking in today!

Happy Thursday!

~ Donna

Wednesday, October 21, 2015

To You & Yours Shaker Card Project Kit

I wanted to share this great video with you on the Shaker Cards Project Kit.  Before we get started though, I see a giant typo on the video... typo's make me crazy, but since it's not mine, I can't fix it!  

So, on with the "Sharker" Cards!  LOL

When I saw these at Convention this summer I fell in love with them.  Sadly, I haven't had time to make them yet, but I still wanted to share them with you.  I think you'll love them too!


Thank you for watching!  To purchase yours, click HERE!  Don't forget to pick up some stamps while they're on sale this week only!  The money you save can be spent on this great kit!  

~ Donna

Tuesday, October 20, 2015

Snowy Night Sleigh Ride

Remember to check this week's Weekly Deals Here

Practice makes perfect, or at least acceptable... so, let me tell you what my practice revealed so you can achieve a better look sooner than I did.

Here we have the end result.  Nice snowflakes falling, bright and beautiful, no fuzzies and a beautiful moonlight ride.


Here we have what happens when your White Craft ink pad needs more ink and you don't wait long enough after stamping the trees to put on your embossing powder!

Granted, it makes the trees seem like they are covered with snow, but I wanted to be able to SEE the trees.  So, if this look is good for you, use white embossing powder before the black (memento used here) is dried.


I started with a piece of Whisper White card stock 5" x 3 7/8".  I used a post-it note and punched a 1 1/4" circle out - being sure to punch so part of the sticky part is in the circle.  Lay that on your card stock where you want your moon.  I used Night of Navy with our Sponge Daubers and swirled the ink onto the the Whisper White, careful not to let my post it note come up at all to leave a nice clean circle below.  (** I don't recommend our sponge for this project, the Daubers work so much better.**)

After I had the Night of Navy the way I liked it, I added Island Indigo to give a little more color to the night sky.  Remove the post-it note and sponge the moon with Tangerine Tango and Daffodil Delight.  Play with the colors - find something that you like best.  Each card can be different.  

Stamp the four-tree stamp from Lovely as a Tree, being sure to stamp over the moon a bit.  BE SURE THE BLACK INK DRIES COMPLETELY.

Then, using a well inked White Craft ink pad, stamp stars from Jingle All the Way onto the background where you want them, immediately adding White Embossing Powder.  Tap off all excess powder and heat set with your Heat Tool.

Cut out the Sled and Horse from Sleigh Ride Edgelits and place it over your card.  Remember to place a little glue under the sled and the horse so they stay down as well.


Thank you for looking in today.  

Don't forget the 15% off sale this week!


~ Donna


Monday, October 19, 2015

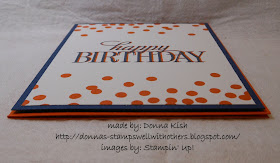
Dotty Angle's Birthday

First of all... Remember - today is the first day of 15% off all stamps from Stampin' Up!  At the time of me typing this I don't have the details yet, but be sure to check my website for full details!


The Holidays can start to take over our card making plans, so I thought it would be a good idea to make a birthday card to show today.

This is a fast and easy card to make and can have such a fun result with a little practice.  


Recipe:  
Base is Tangelo Twist 8 1/2" x 5 1/2", scored at 4 1/4"
Layer 1 - Night of Navy - 5 3/8" x 4 1/8"
Layer 2 - Whisper White - 5 1/8" x 3 7/8"
Stamps:  Dotty Angles and Happy Birthday Everyone (a hostess set)
Tools:  Stamp-a-ma-jig
Ink:  Tangelo Twist and Night of Navy (even though it looks like black)


Inside - simple stamp also from Happy Birthday Everyone "to you".


I hope you have  your wish list ready for this weeks big sale!  I know I do!

Happy Monday!

~ Donna

Sunday, October 18, 2015

Sleigh Ride Christmas

We finally had some rain and are aiming for cooler temperatures in Phoenix on Saturday, so I decided to do a little Christmas.  Sadly, it's still 78 degrees at the time of writing this (11:00 p.m. Saturday), but it's better than still being at 100 degrees!

Maybe some snow on my cards will help!


Recipe:
Whisper White Thick Card Stock base - 8 1/2" x 5 1/2", scored at 4 1/4"
Whisper White cut to 4" wide and then die cut with Sleigh Ride Edgelits Dies
Gold Foil card stock cut to 4" wide and again die cut with Sleigh Ride Edgelits for the houses and the trees
Holidays Fancy Foil Designer Vellum (snowflakes) 4" wide and long enough to just go under the houses.

Since Vellum  doesn't hide adhesive, at all, I put our mini glue dots behind the snowflakes as close to the edge as possible and then covered with Rhinestone Jewels.  If there was no snowflake near the corner, I added one and placed a jewel over it as a star.


I think next time instead of the Gold Foil, I'll use the Silver Foil to match the snowflakes.  What do you think?

Thank you for looking in today.  Have a Blessed Sunday!

~ Donna


Built for Free Using: My Stampin Blog

Saturday, October 17, 2015

Fill Out Your Wish List


Stampin' Up! has announced an incredible promotion that kicks off on Monday, October 19th and runs through Friday, October 23rd.  
For five days only, you can save 15% on ALL Stampin’ Up! stamps.  This sale will include all regular-priced stamps (*rotary stamps, hostess sets, clearance rack items and bundles are excluded.)  Start making your list now, there is only five days to get in on this awesome sale!

More details to come on Monday!

You could even use this extra savings on stamps to create your Stampin’ Up! Starter Kit for even MORE savings.  When you purchase the risk-free, no-further-obligations Starter Kit for $99, you will get $125 of your choice of product AND free shipping.  With an extra 15% off the price of stamps, think how much more stamping product you can choose!
I would love for you to join my group of creative, fun-loving crafters.  If you have questions, please reach out to me - Donna Kish - StampsWellWithOthers@gmail.com or click HERE for more information.

Friday, October 16, 2015

It's Boss's Day!

Happy Bosses Day or is it Boss's Day?  I have more than one Boss, so I'm going with Bosses... LOL  Problem is, the more I look at it, the weirder it looks.  

Since Stampin' Up doesn't have a stamp associated with this day, I had to improvise and made it work.  Using Birthday Blossoms, I stamped "happy" from "happy birthday" and then placed scotch tape over "birth" and inked up "day".  Then I pulled off the tape and stamped day a little farther down.

Then, the hard part, I hand wrote "bosses" (thinking now boss's would have been better!) with my Basic Black Stampin' Write Marker.


Inside I stamped "a day all about you" which is part of the stamp set.  It seems to work, don't you think?  


Since I have more than one boss (even though one of them will be out of the office all day tomorrow and next week), I wanted to make a pretty for her too.  Hi Linda, if you're reading this! 


Recipes:

Both Base - Old Olive 8 1/2" x 5 1/2" scored at 4 1/4"

Card 1 (at the top):
Designer Series Paper Stack - Pretty Petals 5 1/4" x 4"
Old Olive - 4 3/4" x 3 1/2"
Shimmery White - 4 1/2" x 3 1/4"

Card 2 (above)
Designer Series Paper Stack - Pretty Petals 5 1/2" x 2 3/4"
Shimmery White - 4" x 2 1/4"

The flowers are stamped on the Shimmery White as well and then colored using the ink from inside the stamp pad of Calypso Coral and our Aqua Pen.  Shimmery White works like Watercolor Paper without being quite as thick.  I don't recommend painting onto our Whisper White, it doesn't soak in well and doesn't look very good.

Pop up the flowers with Stampin' Dimensionals - which can be punched with Pansy Punch.  I hand cut the leaves, but they were very easy to trim out.


Thank you for looking in today.  Have a happy stampy weekend!

~ Donna

Thursday, October 15, 2015

My Little Thank You's

I always enjoy making my little thank you cards after a workshop.  Here are the ones for this month.

With all the fall colors and Christmas colors out and about, I thought it would be nice to do something bright and colorful so I decided to use Bermuda Bay.


The cards are 6" x 3" and scored at 3" for a nice little size, just big enough to write a little thank you note inside, with Bermuda Bay Stampin' Write Marker, of course!


Stamps used are Gorgeous Grunge - for the little speckled look and Another Thank You in Photopolymer.


The Designer Series Paper (DSP) is from the Brights Color Collection 12" x 12" pack (138434)

Thank you for looking in today!

~ Donna


Built for Free Using: My Stampin Blog