Thursday, March 31, 2016

Paper Pumpkin Offers Support


Today I needed a couple of cards of support for a couple of special people in my life that needed a little cheer.  This month's Paper Pumpkin worked perfectly for this I think.  Billie Moan used Grateful Bunch on some of her cards to add some extra color and I decided that I wanted to give it a try too.

Here are my versions.  Using Bermuda Bay and Cucumber Crush I added flowers and leaves to the card base that came with this months Paper Pumpkin and then using some of the elements from the kit I stamped the balloon and sentiment from Honeycomb Happiness.


For the second card, I stamped the same flowers and leaves and using the stamps from the Paper Pumpkin Kit I I stamped Just For You and added some of the cucumber crush pearls.


I'm happy with how these turned out - love the bright colors together.

Thank  you for looking in today.  Happy Thursday!    ~ Donna


Wednesday, March 30, 2016

So Much News To Share!

Since I've been working 7 a.m. to 10 p.m. this last week, I've not had a chance to remind you all that Sale-a-bration is almost over!  It seems like it just started and now it's almost gone!

Get one free gift for every $50 you order by March 31st. Make sure to order soon before your favorite goodies are gone!  If you would like to add it to my April Hostess' Party - you can use Hostess Code:  AGKXDU7Q - ships your order to your door and Kathy will get credit on her workshop.

OR, if you have a $150 or more order of your own, take credit for your own sales and earn your own Hostess benefits!


Paper Pumpkin is celebrating their 3rd Anniversary and for everyone who is signed up in April, you can receive a FREE STAMP SET in your box of Paper Pumpkin!

Save $5 when you purchase a 3 month Pre-Paid Subscription by March 31st and get a Free Sale-a-bration gift!  Order #137859 - 


  • The Last Chance list will be posted sometime in April, but don't wait to get your favorite retiring In Color products! Reinkers and cardstock always sell out FAST! Shop Now for Blackberry Bliss, Mossy Meadow, Lost Lagoon, Hello Honey, and Tangelo Twist.


Don't miss this great opportunity to join the Stampin' Up! family!  Be a hobbyist and get discounts on all your purchases or gather your friends together and have them help you make your minimums!  Either way is awesome fun! With the $30 Sale-a-bration bonus, you get $155 worth of product for only $99 plus tax! What a deal! Learn More.


Monday, March 28, 2016

I'm Still Here

I just wanted  you to know I'm still here but with very long hours at the office this past week.  Once I recuperate with some sleep, I'll be back to posting again.  

In the meantime, I'm working on some ideas that I want to share with you, so come back again!  (if you sign up for updates via email, you'll know when I post)


I've missed my crafting (sanity) time, but I'll be back to my therapy, I mean, cardmaking again as soon as possible!!


~ Donna

Tuesday, March 22, 2016

Weekly Deals - March 22

It's 3 a.m. in Arizona and my alarm clock will go off soon and I'm awake early.  Why??  Because it's Election Day in Arizona and that's my job, working at the County Elections Office.  

So, since I'm awake (and I didn't post a project), here are this weeks' Weekly Deals!


WEEKLY DEALS

We hope you enjoy this week's Weekly Deals!
139683G


Curvy Corner Trio Punch Item # 139683
Regular Price: $20.00 US/$25.00 CAN
Discounted Price: $15.00 US/$18.75 CAN


Pearl Basic Jewels Item # 119247
Regular Price: $5.00 US/$6.25 CAN
Discounted Price: $3.75 US/$4.69 CAN


Silver 5/8" Satin Ribbon Item # 134548
Regular Price: $7.00 US/$8.75 CAN
Discounted Price: $5.25 US/$6.56 CAN


White Perfect Accents Item # 138416
Regular Price: $5.00 US/$6.25 CAN
Discounted Price: $3.75 US/$4.69 CAN


Gold Stampin' Glitter Item # 133457
Regular Price: $4.00 US/$5.00 CAN
Discounted Price: $3.00 US/$3.75 CAN
Thank you for looking in today!  Happy Tuesday! ~ Donna

Monday, March 21, 2016

Put Your Party Pants On!

When I saw this newest Sale-a-bration stamp set called Party Pants, I just knew I had to do something with it.  Then when I saw my Washi Tape Punch, a lightbulb went off and I had to play.

Here's what I came up with.

The Wildflower Fields Designer Series Paper was just perfect for some wild party pants, don't you think?


Recipe:

Whisper White Thick Cardstock - 8 1/2" x 5 1/2", scored and folded at 4 1/4"
Wildflower Fields DSP 5 1/4" x 4" FREE with $50 order during the month of March, then it's gone!
Whisper White cardstock 5" x 3 3/4"
Punch out the "party pants" of your choice with Washi Tape Punch.


Ink used:  Calypso Coral, Blackberry Bliss, Mint Macaron, Tuxedo Memento Black.


Thank you for looking in today.  I'll post as often as I can during this election week in Arizona!

~ Donna

Sunday, March 20, 2016

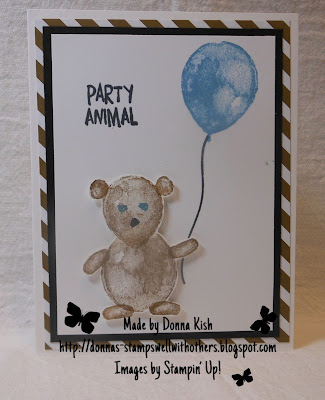
Party Animal Balloon Builders

I simply had to stamp again with the Balloon Builders.  I have a friend who is having a birthday this week and I knew this was the perfect card for him!  


Recipe:

Whisper White Thick Cardstock - 8 1/2" x 5 1/2", scored and folded at 4 1/4"
Neutrals Color Collection (Soft Suede Stripes) 5 1/4" x 4"
Basic Black - 5" x 3 3/4"
Whisper White - 4 3/4" x 3 1/2"


I stamped the bear using Balloon Builders onto Whisper White and then cut him out with a bit of white showing.  Then I popped him up with Stampin' Dimensionals.

The Balloon was stamped again (as a balloon this time) with Marina Mist.

Inside I stamped Happy Birthday Multiple Times - it just seemed right for a Party Animal.  Then I added some more balloons inside with Daffodil Delight and Marina Mist. 


Stamp the back with #imbringingbirthdaysback and the card is ready to go!  Off to Florida for a Birthday Blast!


Thank you for looking in today.  Have a Blessed Sunday!  ~ Donna


Friday, March 18, 2016

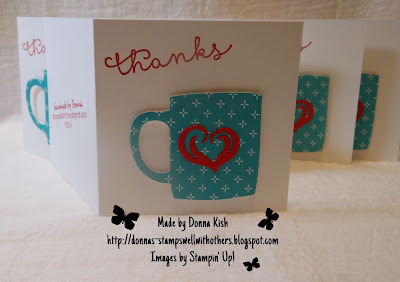
March Thank You Notes

My apologies for being MIA the last couple of days.  My mojo was on vacation and I just couldn't pull anything together after the crazy work week we've had at the office!  For those of you have been reading my blog for a while, you know I work for the county election's office.  When it is election time, we work long hours and I'm lucky to make it to my pillow before crashing.  Next week is Arizona's Presidential Preference Election so no promises on regular postings!  :)

And now on to the fun part!

Last weekend was our March workshop, so here are the little thank you's that I'll be putting into the girls bags.  Clean and simple.


Recipe:  
Whisper White Card Stock - 6" x 3", scored and folded at 3"
Real Red - for the Heart Die (from Cups & Kettle Framelits)
Have a Cuppa Designer Series Paper Stack
Cups & Kettle Framelits Dies
Stamps:  Cottage Greetings 


Thank you for looking in today.  Have a wonderful weekend!  ~ Donna


Tuesday, March 15, 2016

Birthday Bloom Balloons and Weekly Deals!

First of all, don't forget to check out the Weekly Deals!

Today's card is quick and easy and is fun too!


Recipe:
Mint Macaron - 8 1/2" x 5 1/2"; scored and folded at 4 1/4"
Whisper White 4 3/4" x 3 1/2"
Birthday Bouquet Designer Series Paper (140557) 4 5/8" x 2 1/4"
Tags & Labels Framelits (138282) with Mint Macaron and Whisper White
Stamps: Birthday Blooms (140655)
Gold Metallic Bakers Twine (132975)


Of course, since it is a Birthday Card - I added my #imbringingbirthdaysback stamp to the back of the card and to the envelope.

YOU can get in on the Birthday Card movement too and purchase the #imbringingbirthdaysback stamp!  Order number - 143575 - it comes in wood mount.  


Thank you for looking in today - Have a Happy Tuesday! ~ Donna

Monday, March 14, 2016

Fancy Fold Tea

My mother love beautiful teacups and saucers - and now I love them too as they were passed down to me.  When I first spotted the beautiful Birthday Bouquet Designer Series Paper (140557) and the Cups & Kettle Framelits Dies (140624) I knew I wanted to make something beautiful with the two of them together.

Last week I spotted this card on Patty Bennett's blog and fell instantly in love.  Then I read her story that went with it about an antique cup and saucer she has and I had to smile.  I knew I had to make this card.  I made a couple of little changes, but nothing big.  Thank you Patty for sharing - I just LOVE this!


Recipe:  

Begin with a piece of Blushing Bride Cardstock 8 1/2" x 5 1/2".  With the long side across the top of your scoring tool, score at 2 1/8" and 6 3/8".

Birthday Bouquet Designer Series Paper - 5 1/4" x 1 7/8" (cut 2)
Whisper White Cardstock -  5" x 1 3/4" (cut 2)
Stamp the Whisper White pieces with the single flower from Birthday Blooms using Blushing Bride
Using a Sponge or a Dauber, sponge the edges with Blushing Bride.

Attach to the front panels.

Place your teapot framelit and your cup framelit onto the DSP where you want the flowers to be.


Also cut another set in Blushing Bride Cardstock to adhere to the back of the DSP to give it strength.


Patty placed both her teapot and teacup on the left panel, but I wanted mine to open with one on each panel.

Pop them up with Stampin' Dimensionals - remember not to put any Stampin' Dimensionals on the teapot spout or on the left side of the cup... ask me now I know.  :)


I cut a small piece of doily for each panel placing the cup over the right side and a silver spoon using the Cups & Kettle Framelits set.


Inside I used a piece of the Blushing Bride striped paper from the Birthday Bouquet DSP.  Sadly these pretty stripes are on the back side of the pretty flowers used to make the cup and teapot.  I don't think I'd use that on all my cards, because I love the flowers so much, but I wanted something special for inside this card. 


So that I didn't cover up too much of the pretty stripes, I cut the Whisper White Cardstock 2 1/2" x 3".

Here's a closer look at each panel with the teapot and teacup.


Thank you for looking in today - Happy Monday! ~ Donna

Sunday, March 13, 2016

Totally Awesome Workshop!

On Saturday we held our March Workshop and it was Totally Awesome!  One of the cards we made today was one that I posted on Friday.  If you missed it, you can see it HERE

So I  though you all might like to see how the cards came together.  After looking at them and taking pictures, I realized I never really gave any specific instruction what to do with the Linen Thread.  They could see the sample, of course, but here is what they came up with.

Brittney even changed up the whole card by placing her die cut on the bottom and moving the flowers to the right.  She also tied the Linen Thread across the top and attached little flowers to the ends. 


I'm not sure I see thread on Linda's but it looks great with the flower on the bottom corner.

Sue placed her thread under all the flowers by randomly stringing it along.


Mary tied across the bottom with a bow and a little flower.

Kristi's thread doesn't seem visible here, but it may be underneath.


Tina put her's across the bottom without a bow and added a bigger blue flower.

All in all, I think they all look great!  When we all started stamping together, there wasn't a lot of variety, but now, I love they are all finding their own style!

Kathy and Patti were still working on their's so I didn't get any pictures.   I'm sorry ladies!

Thank you for looking in today - have a Blessed Sunday! ~ Donna

Contributors