Tuesday, June 20, 2023


Time for you to stock up and save on your favorite Stampin’ Up! products! 


What’s the big occasion? On 21 June 2023 only, we are offering FREE shipping on orders subtotaling $75 USD or more (before taxes). This incredible deal lasts for 24 hours only so make those lists and be ready to SHOP!

Sunday, March 5, 2023

New Online Exclusive Products


Stampin' Up! has launched something brand new this month – a collection of Online Exclusive products. You won't find these products in any of our catalogs as they'll only be listed in the online store. There will be further releases of Online Exclusive products throughout the year so there will be new products to purchase in addition to those we will see in our new catalogs!


Here are a few of the products that are available in my online store.  


The Hello, Irresistible Suite Collection is full of artistic and colorful desig    ns with a touch of elegance. Combine artistic paper full of florals and color washes with coordinating stamps and die-cut images, along with elegant greetings and colorful embellishments to create irresistible projects!


Check out these two new bundles. 

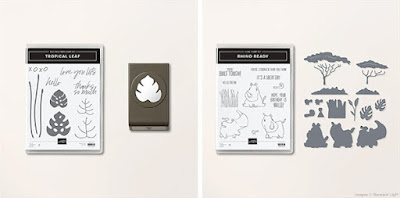
The Tropical Leaf Bundle will let you create your own tropical paradise with the coordinating punch making cutting out all those leaves a breeze. 

The Rhino Ready Bundle has all the elements to create savanna scenes, with cute and playful rhinoceros images to bring it to life. Don't forget that by buying the stamp set and coordinating punch or die set as a bundle you'll save 10%.


The Online Exclusive collection also includes stand-alone dies and stamp sets. 

The Classic Letters Stamp Set is more than just a sophisticated alphabet that will add stylish greetings and text to all sorts of projects as the additional greenery flourishes can be added to any of the letters or numbers. 

Use the Elegant Borders Dies to create borders and elegant background outlines for your projects. These dies line up perfectly on the edge of a card or envelope, allowing you to add lacy edges and delicate flourishes.


No product collection is complete without elements that can add depth and texture to your projects. The Basics 3D Embossing Folders include textures that will complement any project. 

The three folders in this pack give you flower, hobnail-glass dot, and crosshatch designs to use in your crafting. Each sheet of the Naturally Gilded 12" x 12" (30.5 cm x 30.5 cm) Specialty Designer Series paper has a silhouette of delicate florals or slender trees and is printed in metallic foil and covered with subtle spatters.


These are only some of the new products that are available for you to order.  You can see the full collection in my online store. Although there is no cut-off date for ordering these products, some items may not be restocked once supplies run out, so you don't want to wait to order anything that catches your eye!


Sunday, January 29, 2023

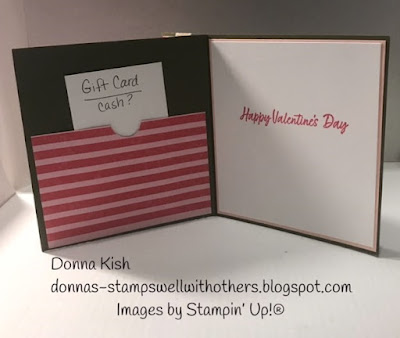
Valentine's Day - Gift Card Holder

Valentine's Day will be here before you know it!  Are you ready for a cute card that holds a gift inside?


Recipe:

Country Bouquet Stamp Set

Mossy Meadow – 4 ¼” x 11”, scored and folded at 5 ½” and 4”

Country Floral Lane DSP – 1 3/8” x 4 1/8” (side strip)

DSP Front Panel Sweet Sorbet Hearts pattern – 3 7/8” x 4 1/8”

Petal Pink Mat – 3 ½” x 3 ½”

Basic White – 3 ¼” x 3 ¼”

Scrap of Petal Pink for Sentiment – punch with heart punch


Inside:

Petal Pink Mat – 4 1/8” x 3 7/8”

Basic White – 4” x 3 ¾”

DSP – 2” x 3 ¾” for gift card pocket – remember ONLY glue three edges so the gift can slip in.


  • Attach the small DSP strip to the outside left hand area.  BEFORE you glue the side panel where the ribbon goes, wrap the Burlap Ribbon around the front and tape it inside the “card”.
  • THEN glue the side panel together. 
  • Tie the Red Ribbon around the Burlap Ribbon.
  • Using your Stamp-a-ratus – stamp the flowers in Sweet Sorbet and the leaves in Mossy Meadow.
  • Stamp sentiment onto Petal Pink heart
  • Punch hearts from DSP (or you can stamp them with stamp set – then punch) and attach to front with Stampin’ Dimensionals.  Attach Petal Pink heart on top of all.
  • Attach mat onto front with Stampin’ Dimensionals.
  • Inside – attach DSP strip to the left side panel.  Be sure to ONLY put glue on the sides and bottom so that the gift card or cash will slide in from the top.
  • Stamp inside sentiment and attach to inside of card.


Time to start those sweet Valentine's cards!

Thank you for looking in today!

Tuesday, January 17, 2023

Beautifully Happy - Sale-a-bration 2023!

It's Sale-a-bration time again and I just love this set in the catalog.  You could use any colors with this set and you would have beautiful flowers to put on any card for any occasion.


Recipe:
 
Pool Party – 5 ½” x 8 ½”, scored and folded at 4 ¼”
Pool Party – 4” x 5 ¼” – die cut with Stitched Greenery – (155451)
Basic White – 3 ½” x 4 ¾” – die cut with largest scalloped frame from Scalloped Contours (155560)
Basic White – 4” x 5 ¼” – inside panel
Basic White – scrap for sentiment
Linen Thread – 14” double and tie into a bow – attach with glue dot.
Opal Rounds – (154289)
 
·       Stamp outline of flowers from Beautifully Happy (SAB set) with Memento Black.
·       Stamp flowers with Pool Party – stamp off first for a light image
·       Stamp leaves with Pear Pizzazz – stamp off first for light image
·       Stamp tiny bee – color with Daffodil Delight Stampin’ Blends (you can also stamp the bee color with teeny tiny body stanps)
·       Color the bee’s wings with Seaside Spray Stampin’ Blends
·       Attach to Stitched Greenery panel with Stampin’ Dimensionals
·       Stamp sentiment onto Basic White Scrap, trim the ends as desired.  Pop up with Stampin’ Dimensionals.  


Product List

Sunday, November 13, 2022

Seasonal Sale - November 15th through November 18th

Stampin' Up! is hosting a 4-day Seasonal Sale on Tuesday, November 15 through Friday, November 18th!


The sale features select products from the 2022–2023 Annual Catalog with the following discounts:

  • 10% off all punches
  • 15% of all stamps (Host stamp sets are not included in this sale)
  • 20% off all dies
  • 20% off all embossing folders
  • 20% off all non-specialty Designer Series Paper

With the season of giving upon us, this is a great opportunity to buy gifts for your fellow crafting enthusiasts, or to stock up on supplies for yourself.

Remember, this sale is for four days only! For a complete list of all the discounted products, check out the flyer below!  Make your wish list and be ready for the sale to begin!

Seasonal Sale

I also wanted to give you the heads up on the December 2022 Paper Pumpkin kit! This kit comes with enough supplies for you to make 16 different gift card holders—2 each of 8 designs. 


Plus, this month you can take your Paper Pumpkin crafting even further with a special add-on! Give a gift card and a personalized card with the Good Things Cards & Envelopes add-on. You get 16 cards (4 each of 4 designs) and 16 coordinating envelopes. This add-on is available now during the subscription period but will only be available while supplies last, so don’t wait! 


Be sure to mark your calendar so you don’t miss out!  SHOP HERE!

Please let me know if you have any questions!

Donna 

Tuesday, October 4, 2022

FREE Shipping Today

 Today Only!!!  

Don't miss this opportunity for free shipping on orders of $75.00 (before tax)!  

Please use Host Code QBWJADQ2


Sunday, October 2, 2022

Candy Cane Easel Card

Here is one of the cards made at our Cozy Craft Retreat last weekend.  We had so much fun crafting and spending time together.  Thank you Lorri for our fun Annual Retreat!


This card base uses a full 8 ½” x 11” piece of Real Red cardstock.

 Card Base:

The Real Red card base score and cut lines are shown in the diagram on the side.  The areas with the Blue X’s are cut off – SAVE THE SCRAPS.  Fold on score lines as shown in completed card.


  • Cut (2) 5 ¼” x 1 7/8” strips from Sweetest Christmas DSP and adhere to panels on the front of the card.  Cut (2) more strips of a different DSP (or use the same as I did in my card).
  • Wrap around card and adhere ends on front side of card.  Do not make this too tight or it will be hard to slip on and off.
  • Red panel – 3 ¼” x 4 ¼” – Center and attach to front of belly band covering the seam.
  • White panel – 3” x 4” – attach to Red Panel
  • Stamp (2) candy canes using Real Red ink onto white scraps, die cut and place onto white panel on the belly band.  DO NOT ATTACH so you can stamp sentiment FIRST using Real Red ink, then attach using Stampin’ Dimensionals.
  • Stamp (2) mistletoe pieces using Garden Green ink onto white scraps, die cut and adhere to candy canes as shown.
  • Tie a bow using Real Red Ribbon and adhere to candy canes with a glue dot.

Easel inside

3 7/8” x 5 ¼” Real Red

3 5/8” x 4 7/8” Basic White


  • Stamp sentiment onto Basic White using Real Red and Mistletoe stamp using Garden Green.  Attach white panel to red panel.
  • Attach both to the BOTTOM half of the center folded Real Red.
  • Using one of the red scraps from the card base, stamp sentiment using VersaMark and heat emboss with white embossing powder.
  • Die cut using Labels Aglow die
  • Adhere label with Dimensionals to inside bottom of card as shown.  Bottom edge of die cut should be about ½” from the bottom edge of the card.
  • The tag at the bottom is what will hold the easel card propped up as shown in photos.


This card was really easy and I love how fun it is!

Thank you for looking in today!

Product List

Contributors