Tuesday, March 8, 2016

Oh, Hello Swap Card

Here is my swap card from our team meeting at the end of February.  Isn't she just adorable?

Chickies need a safe place to be, so she has a "chicken wire"  background made with the Honeycomb Embossing Folder (129378).  Perfect!


To make the "chicken wire" run ink on the inside of the Honeycomb Embossing folder on the side tha sticks UP.  This doesn't have to be perfect to make it look a bit shabby.


Place your cardstock - I used Delightful Dijon - on the clean side and carefully close the inked side over onto the cardstock.


Hold firmly in place.


You can either rub your hand over it, which works well, or use the bottom of your Multi-purpose glue bottle.  A bone folder would also work well.  I tried using one of my clear blocks but found it tended to scuff up the block.
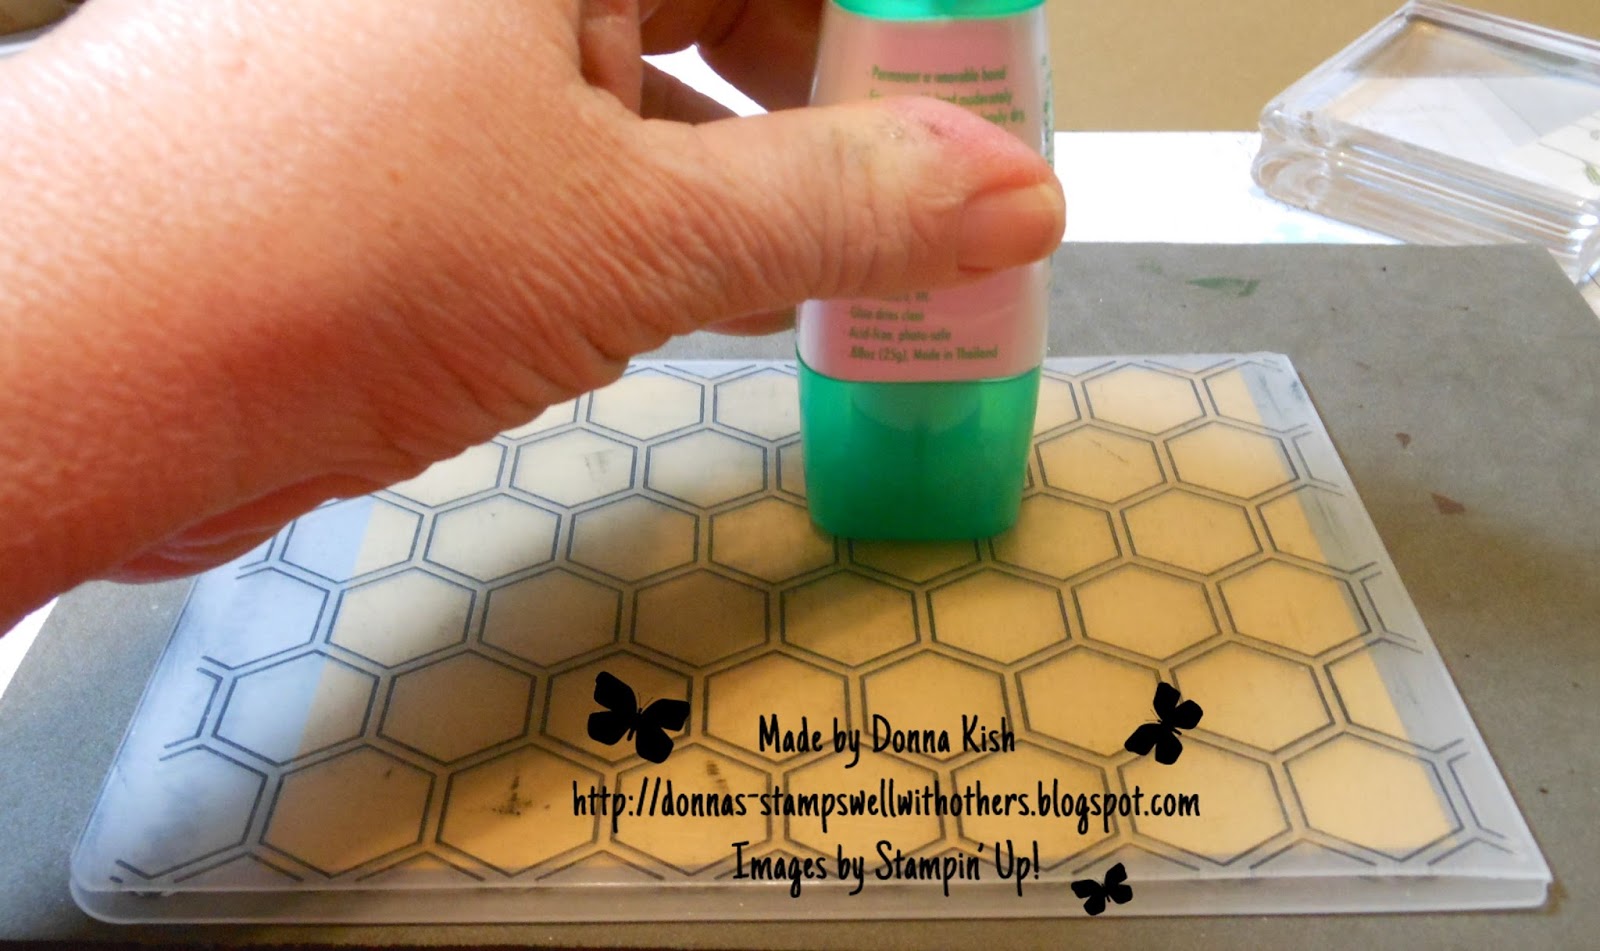

Open to find your "chicken wire".  Ta Da!


Here is the rest of the Recipe:

Base - Basic Black - 8 1/2 x 5 1/2" scored and folded at 4 1/4"
Delightful Dijon - 5 1/4" x 4"
Ribbon - 3/8" Stitched Satin Ribbon in Basic Black (138430) - about 7 inches - wrap around Delightful Dijon and tape to the back.
Very Vanilla scraps - for stamping sentiment and punching with Washi Label Punch (138296) 

Very Vanilla 3 1/2" x 3 1/2" (see instructions below to make scallop)
Delightful Dijon - 2 7/8" x 2 7/8"
So Saffron - 2 3/4" x 2 3/4"

Stamps - Honeycomb Happiness - FREE from Sale-a-bration (wood - 141288 / clear mount 141291)
Ink - Memento Black
Stampin' Write Marker - Pumpkin Pie (for beak and feet)
Wink of Stella - Clear (141897) to color all of the chickie.


To make the square scallop:


And here they are just before going into my bag for my swap!


Thank you for looking in today!  Happy Tuesday - Don't forget to check the Weekly Deals!  ~ Donna

Monday, March 7, 2016

Put Your Party Pants On

Time to make some more Birthday Cards for #imbringingbirthdaysback!  

Perfect party paper is "It's My Party" Designer Series Paper Stack (140552) from the Occasions Catalog on page 5.


Recipe:

  • Whisper White Thick Cardstock - 11" x 4 1/4" scored and folded at 5 1/2"
  • It's My Party DSP - 5 1/4" x 4"
  • Whisper White Cardstock (strip) 4" x 1 1/2"
  • Whisper White Cardstock (sentiment) 2 3/4" x 2 1/2"
  • Melon Mambo (or Crushed Curry) 3" x 2 3/4"
  • Stamps:  Big News (wood mount - 134015 / clear mount - 134018) / Party Pants (FREE with Sale-a-bration)
  • Mint Macaron / Crushed Curry (balloons)
  • Balloon Bouquet Punch (140810 - photopolymer)
  • Ink - Memento Black (132708)


When I decided to turn the card vertically instead of horizontally, I found that the "it's your birthday" sentiment I had pre-made wouldn't fit, so I put them inside instead and used "Party Pants" on the outside with a longer strip instead.  I honestly just used scraps, so I don't have any measurements for you on those.  I knew I wanted it bigger than the small square of the little stamp, so I picked up some scraps and put them together! 

Ta Da! 

I made one with a banner cut at the end and the other with solid ends.


Thank you for looking in today!  Happy Monday!  ~ Donna 


Sunday, March 6, 2016

For the New Two

Today my best friend from high school walked her youngest daughter down the aisle to marry the man of her dreams!  Something that special calls for a beautiful card.

This is what I came up with.  I have to say, I'm really tickled with it!


I began with Whisper White Thick Cardstock (140272) - 8 1/2" x 5 1/2", scored and folded at 4 1/4"

The next layer is also the Whisper White Thick cut at 5 1/4" x 4" and run through the Big Shot with the Softly Falling Textured Impressions Embossing Folder (139672).

Even the Bloomin' Heart Thinlits Dies (140621) was used with the Whisper White Thick Cardstock.  I wanted this to be a nice solid card that would last forever.

I popped up both layers with Stampin' Dimensionals.  Some had to be cut pretty small to fit on some of the little leaves at the edge, but it worked well.


Across the bottom I cut a piece of Botanical Gardens Designer Vellum (141019) FREE as a Sale-a-Bration item with a purchase of $50 (before tax and shipping).  I cut it 2" x 6" stamped it with For the New Two (137147) from the Annual Catalog using StazOn Black (101406) and letting it dry for quite a while.  Vellum takes longer to dry, but it sure has a nice look, I just wish you could see it better!

I then folded it over the Softly Falling layer and taped it onto the back with just basic scotch tape.


I added Pearl Basic Jewels (119247) to the flower centers and a bow of  5/8" Organza Ribbon (114319).

Inside I made a pocket from Whisper White Cardstock (not thick) cut 2" x 4 3/4" and scored at 1/4" on either side.  I also added more of the Botanical Gardens Designer Vellum to the outside of this before sealing it to the inside of the card with Tear and Tape Adhesive (138995).


 Perfect pocket for a gift card!


Inside I stamped another sentiment from For the New Two.


Don't forget the envelope.  Because it wasn't being mailed, I stamped on the outside for placing in the gift basket at the wedding.  Perfect!


Thank you for looking in today.  Have a wonderful Sunday - Donna

Friday, March 4, 2016

Tri-Fold Flowering Wildflowers

Today's card is so colorful and beautiful and can be used for so many occasions.  I spotted this on Brenda Quintana's blog.  I changed up the colors and the specific DSP page that she used and sentiments, but the measurements are all Brenda's.  Thanks Brenda!


Start with a piece of 11" x 5 1/2" Whisper White Thick Cardstock.  The regular Whisper White works, but the thick is sturdier.  I only had one sheet of thick (until Mr. Brown shows up tomorrow!), so I made it both ways.

Using your Simply Scored Scoring Tool (122334) lay the long edge across the top and score at 4 1/4" and 7 5/8".  If you are using your Stampin' Trimmer (126889) you can score at 4 1/4" then flip the paper over and score at 3 3/8" to end up with the same measurements.  

Turn the card so that the largest section is to your right.  Cut a piece of DSP 5 1/2" x 1" and adhere it to the far right edge.

Choose three colors from the DSP that you want to use on your panels.  I chose Blackberry Bliss, Old Olive and Calypso Coral. Using the Tags and Labels Framelits (138282) Choose the two largest ones - that would be one from each of the two stacks of frames.


To save on waste, cut your colored cardstock at 2 3/4" x 2 1/4" and Whisper White cardstock at 2 1/2" x 2".


On the Whisper White Cardstock, stamp one of the flower stocks from Flowering Fields (wood - 141300 or clear mount - 141303) one of the FREE sets available during Sale-a-bration!  Match the color ink for the stamp to the color cardstock.


Stamp your sentiment in the matching color below and lined up across all three panels.


I've made one more card with a different sentiment, but I can't share it until the recipient receives it!  She peeks in her when her health allows and I don't want to spoil her surprise!  Tee Hee!

Thank you for looking in today.  Friday is finally here!  Enjoy and Have a Great Day!  ~ Donna

Wednesday, March 2, 2016

Team Swap Cards

I wanted to share some of the great swaps we had at our Team Meeting on Monday.  

This one will surprise you.  Do you see the bunny hiding behind the fence?  

Are you sure?

Ohhh... it's not a bunny!!!  It's a BEAR!  So cute!

This card was made by Stefanie.  I thought this was so clever!


This one was made by Kimberley.  These flowers are so fun and versatile and they come with a punch in a bundle!  Always great to have a punch for those hard to fussy cut stamps!


Thank you girls for your swaps!  

I'll be sharing more as time goes on.  For now... I'm heading to bed so this can post at midnight!

Thank you for looking in ~ Donna

Timeless Elegance Sympathy

A quick and simple sympathy card with just a touch of color.

Recipe:

Base - Very Vanilla - 8 1/2" x 5 1/2", scored and folded at 4 1/4"
Basic Black - 5 1/4" x 4"
Timeless Elegance Designer Series Paper - 5" x 3 3/4"

Basic Black - 3" x 3"
Very Vanilla - 2 3/4" x 2 3/4"

Stamps: Rose Wonder
Dies - Botanical Builder Framelits  

Blushing Bride for the flowers and Basic Black for the insets of the flowers.
Pearl Basics for the centers.
Blushing Bride Stampin' Write Marker to color the Designer Series Paper flowers.


Thank you for looking in today - Happy Wednesday!  ~ Donna

Tuesday, March 1, 2016

Wildflower Fields

Beautiful Designer Series Paper you can earn for FREE!  Flowering Fields is just one of the great items available for free when you order $50.00 (before shipping and tax).  

Here's how I put mine together. 

Base - Calypso Coral 8 1/2" x 5 1/2", scored and folded at 4 1/4"
Blackberry Bliss - 4 3/4" x 3 1/2"
Designer Series Paper - 4 1/2" x 3 1/4"
Strip - 5 1/4" x 5/8" (then slip it into the Washi Tape Punch and snip off just a bit)
Circles are:
1 1/2" Circle Punch Whisper White
1 3/4" Circle Punch Blackberry Bliss
1 7/8" Circle from Circle Framelits (fourth one up from the smallest)

Stamps:  Birthday Blossoms
Ink:  Black Berry Bliss
Flower - Itty Bitty Accents Punch Pack
Pearl Basic Jewels


This one I turned sideways, but I don't like how the white ribbon turned out.  It really needs the Blackberry Bliss.


Thank you for looking in today - don't forget to check out the Weekly Deals!  ~ Donna

Contributors