Showing posts with label One Big Meaning. Show all posts

Monday, October 16, 2017

Multipurpose Chef

Wait!  I bet you think you received the wrong email or the wrong page on the blog... but you didn't.  This is a NEW card that looks the same as yesterday, but this one is a Thank You card.

Isn't that fun?  I really love the chef making icing sentiments, so I thought I would do a couple more.


Recipe:
Whisper White - 8 1/2" x 5 1/2", scored and folded at 4 1/4"
Real Red - 5 1/4" x 4"
Whisper White - 5" x 3 3/4"
Designer Series Paper (DSP) - Pick a Pattern - 5" x 1 1/2" 

Stamps:  Birthday Delivery, One Big Meaning
Ink:  Real Red, Memento Black
Stampin' Write Marker - Real Red
Stampin' Blend Alcohol Marker - Ivory (for skin)
Stampin' Blend Alcohol Marker - Dark Smoky Slate for Mustache and Hair
Stampin' Blend Alcohol Marker - Light Pool Party (used in the bottom pictures for shading)


After I took the pictures for posting, I thought about adding a little more.  It is really hard to see in the picture below but I used the Light Pool Party Stampin' Blends pen on all the shadowing areas.  It looks much better in person though.


Thank you for looking in today.  Let's start the week off with a big smile!

~ Donna

Sunday, September 17, 2017

Leafy Layers

This quick card idea comes from Sarah Wills.  As soon as I saw her card, I just knew I had to give it a whirl.  I used the Leaf Punch instead of a die she used (because I don't have it - yet).  I like the leaf punch though and will be making more, with some better placement.  This one needs some tweaking.


Recipe:
Very Vanilla - 8 1/2" x 5 1/2", scored and folded at 4 1/4"
Basic Black - 5 1/8" x 3 7/8"
Very Vanilla - 5" x 3 3/4"
Very Vanilla - scraps for punching the leaves
Very Vanilla - Stitched Oval Die Cut

Stamps - One Big Meaning - Cajun Craze

Spooky Night Designer Series Paper - Pumpkins Page
Patterned Pumpkins Thinlits Dies - they will cut two of the pumpkins


Randomly place the leaves on the 5" x 3 3/4" Very Vanilla with Liquid Multipurpose Glue.  Let dry and make sure all your bits and edges are down.  Trim any that hang over the edge.

Stamp your sentiment FIRST, then you can add the pumpkins.  If you do the pumpkins first, you will struggle with stamping the sentiment.

Pop up the oval with Stampin' Dimensionals.


Thank YOU for looking in today.  If you would like to receive this card, simply place a $50.00 (or more) order in my online store, using hostess code 3YPX4U6G before midnight September 30, 2017. You will also receive some bling with your card.

Have a Blessed Sunday!

~ Donna

Saturday, September 16, 2017

A Seedy Thank You Pouch

For some crazy reason, I've been hooked on Sunflower Seeds lately.  I blame my hubby as he's had then around recently and I'm addicted.  Also, they keep me awake when we're watching a program and I keep drifting off.  I figure it's a better snack than a bowl of chips and dip or ice cream and brownies, right?

So, when I saw this idea on Dawn Olchefske's blog, I knew I had to do my version of it.  Dawn stamped her flowers, and I probably will too, maybe this weekend, but for today, I simply snipped out some flowers from the Painted Autumn Designer Series Paper.


Here you can see the three flowers I snipped out.  If you look closely, you can see the two flowers that are together I snipped out the little bit of blue that was between them, while still keeping them attached.

That way, I could slide the three blooms together the way I wanted them to be.


On the back, I simply added a piece of scotch tape to keep them together and then attached them to the seed bag with glue dots.


The bag is our cellophane 2" x 8" bag and I simply folded over the top a couple of time and stapled it shut.


I made a bow out of the Vintage Crochet Trim and a quick banner from One Big Meaning stamped with Cajun Craze onto Very Vanilla.


Thank you for looking in today!  Have a fabulous weekend!

~ Donna


Product List

Saturday, June 17, 2017

A Special Pretty Kitty

Today I want to share a card that I made for our Veterinarian and Staff... mostly staff actually since we saw them three times a week for the last month and a half.  Unfortunately, we had to say goodbye to Suzi as she had stopped eating and drinking.  It was time.

I chose this Pretty Kitty in the pot, because frankly I love coloring that pot with my Chameleon Pens... and Suzi always like hiding in boxes, bags, bowls, etc., so this was perfect.

Recipe:
Very Vanilla - 8 1/2" x 5 1/2", scored and folded at 4 1/4"
Crumb Cake - 5 1/4" x 4"
Coffee Break DSP - 5 1/4" x 2 1/2" (I think...) it's sealed up in an envelope to go to the Dr. tomorrow so I can't measure it now.
Crumb Cake 3/8" Classic Weave Ribbon 


Inside stamp - One Big Meaning


Thank you for looking in today and especially thank you for all of you that lifted us up in prayer as we were able to spend an additional month and a half with Suzi.  We we very happy she didn't really indicate that she didn't feel good until this week on Wednesday.  

Blessings 
~ Donna

Monday, April 11, 2016

Awesomely Artistic Thanks

Time for some Thank You cards.  We can all use "thank you" cards and so many people should use them way more often.  I can remember always taking the time to write a thank you note when I receive a gift for a birthday, holiday or for anything special that needed that little bit of thanks.


Today's card took a couple of renditions to get what I wanted, but I think I've got it now.

Recipe:
Whisper White Thick Cardstock  - 8 1/2" x 5 1/2", scored and folded at 4 1/4"
Watermelon Wonder - 5 1/4" x 4"
Whisper White - 5" x 3 3/4"

Ink:  Blushing Bride, Watermelon Wonder, Crumb Cake
Butterfly - Blushing Bride and Calypso Coral


Stamps: 
Awesomely Artistic (wood - 138694; clear mount - 139950)
Butterfly Basics (wood - 138813; clear mount - 138816; photopoly - 137154)
One Big Meaning (wood - 138788; clear mount - 139420)
Watercolor Wings - (photopolymer - 139424)


My first round of photography, I realized I didn't add the pearls, so these pictures below are before adding the pearls.  What a difference it makes!


Yep, definitely needs the pearls! 


Thank you for looking in today!  Happy Monday!  (yep...  it's Monday again!) ~ Donna

Monday, August 17, 2015

Masculine Thank You With One Big Meaning

Did you know there is one of our Designer Series Papers (DSP's) that carried over from last year's Annual Catalog?  That's right - I don't think I've ever seen that happen before, but I could be wrong.

The Typeset Specialty Paper is a thinner paper from all the others, but it works so well being thin and is very usable for those masculine cards when you don't want flowers or cute little baby things.


Recipe:

Basic Black cardstock - 8 1/2" x 5 1/2" scored at 4 1/4"
Designer Series Paper - 5 1/4" x 4"
Inside liner - Very Vanilla - 5 1/4" x 4"
Stamp Set:  One Big Meaning


Don't forget to dress up the envelope too!


Thank you for looking in today!  Happy Monday!

~ Donna

Built for Free Using: My Stampin Blog

Tuesday, August 11, 2015

Joy Fold Thank You

I loved making the first Joy Fold Card so much, that I wanted to make some more, so here it is with the beautiful Bohemian Designer Series Paper.  Don't you just love the bright colors that goes with this paper?


Begin with a base of 7" x 5 1/2" then score it at 2 3/4" to make a shortened front cover.  For this card I used Blackberry Bliss.

The second card layer is 6 1/2" x 4 1/2", scored at 3 1/4", I used Bermuda Bay for this layer.


Cut a piece of DSP 5 3/8" x 2 5/8".  


Cut two pieces of cardstock on which you will be stamping - 4 3/8" x 3 1/8".  Here I used Very Vanilla.


This DSP (Designer Series Paper) also has matching Washi Tape, so use it to decorate the smaller cardstock panel inside and out.


Inside there's room to write a little note.  If you want to write more, you can also add some plain cardstock inside the smaller panel to have more writing space.


Thank you for looking in today!

Don't forget to check out this weeks WEEKLY DEALS!

~ Donna


Built for Free Using: My Stampin Blog

Monday, August 3, 2015

Floral Wings Thank You Gift

Today is my first day back to work after Convention.  A week of travel and a week of rest and crafting at home.  It was a fun time off, but I miss my office friends - weird, I know - but I do!

Even more special today, we're celebrating the birthday of a very dear lady at the office who, sadly, will be retiring at the end of the month.  I'm going to miss her like crazy!

Since she's retiring, I figured she would need some Thank You cards as I know she'll be getting some wonderful gifts after being with us nearly 30 years.


I spotted a similar card layout on Flowerbug's Inkspot by LeeAnn Greff.  Mine are made on our Whisper White Note Cards rather than on full size (5 1/2" x 4 1/4") cards.  Thank you LeeAnn for a great idea.  These were so fast and easy to do and still have a beautiful result.


The borders are stamped with Floral Wings which is a hostess set on page 180.  I love this set because you can make your flowers any color and not have to color the stamps with our markers as the flowers and the vines are separate.


I chose to use Pear Pizzazz for the vines and Blackberry Bliss for the flowers and sentiment.  The sentiment comes from One Big Meaning.


Thank you for looking in today.

If you are reading this in an email, please be sure to click on the link to take you to my blog to see the items used up close so you can shop easily if you wish.

Happy Monday - wish me well on my first day back at the office!

~ Donna


Built for Free Using: My Stampin Blog

Thursday, June 25, 2015

Workshop Thank You's June 2015

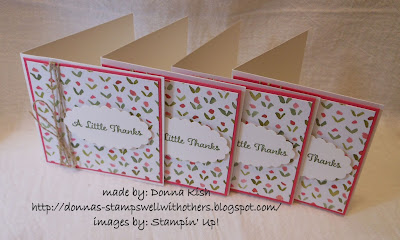
Yesterday's card was so pretty, I just had to continue the theme for today's Customer Thank You notes.  I love making these little 3" x 3" notes for my customers.  They are fun, fast and pretty!


I started with a 6" x 3" Whisper White piece of card stock, then a square 2 7/8" x 2 7/8" of Melon Mambo and then DSP 2 3/4" x 2 3/4".

Next, Linen Thread wrapped around one end and tied in a small bow.  Stamp "A Little Thanks" from One Big Meaning and punched it out with the Scalloped Oval punch.


Just a quick post today since it's nearly midnight again and past bedtime again!  It was totally worth it though to be later tonight.  I had a wonderful dinner with my best friend from high school having some catch-up time.  Time passes by way too quickly and we were way past due for some time to visit.

Thank you for looking in.  Be sure to check out the great deals this week on our weekly deals!

~ Donna


Built for Free Using: My Stampin Blog

Tuesday, June 23, 2015

English Garden With One Big Meaning

Here are a few cards I whipped up Monday night.  These were so easy and so beautiful with another sheet from the English Garden Designer Series Papers.

Just a little change on each card makes it different from the next all of which will brighten up anyone's day!


Recipe:

Card Base - Blushing Bride - 8 1/2" x 5 1/2", scored at 4 1/4"
Soft Suede - 5 1/4" x 4"
DSP - 5 1/8" x 3 7/8"
Sentiments:  One Big Meaning (various sizes)


Thank you for looking in again.  If you see this early in the morning, be sure to come back later to see the Weekly Deals for this week.

~ Donna


Built for Free Using: My Stampin Blog

Contributors