Showing posts with label Garden in Bloom. Show all posts

Thursday, August 27, 2015

Garden in Bloom Sympathy

Time for more Sympathy Cards.  I'm beginning to think I need to just make a batch of these so I don't have to keep making more.  Two different women we know lost their Brother's in the last couple of days.  That's so sad.  My brother and I aren't close - we're 11 years apart in age - but I would still be devastated if I lost him.


I wanted something soft and blue for both of these.  Soft Sky fits the bill nicely and and I think goes really well with Smoky Slate.


Recipe:
Soft Sky - 8 1/2" x 5 1/2", scored at 4 1/4"
Smoky Slate - 5" x 3 3/4"
Whisper White - 4 7/8" x 3 5/8"

Stamps:  Garden in Bloom, Thoughts and Prayers, A Dozen Thoughts
Ink - Soft Sky
Embellishments - Pearl Basic Jewels (and some retired Large Pearl Basic Jewels)


Thank you for looking in today!

~ Donna


Built for Free Using: My Stampin Blog

Sunday, July 12, 2015

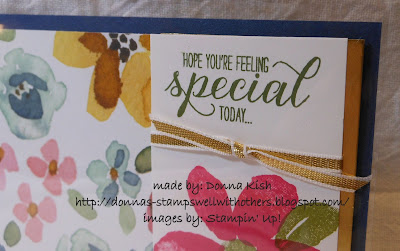
Special Garden in Bloom

Can you tell I really love the Garden in Bloom stamps and English Garden DSP?  I'm just a flowery girl and these are some of my favorites.  I was sad to see the Painted Blooms go away after this past spring, but thankfully English Garden is just as pretty!


I started with a base of 8 1/2" x 5 1/2", scored at 4 1/4".  The card above uses Night of Navy with the multi-colored flowers from English Garden DSP and the card below uses Mossy Meadow with the yellow flowers.


The DSP is cut 4" x 4" and placed at the left of the card.  The banners are both 2" wide with the Whisper White starting out at 3 3/4" and the Gold Foil sheets 4" long and then punched with the Banner Triple Punch.  I wanted the gold to be a tad longer when I layered them.

Punch the banner ends first, so you know where to stamp the flower, then stamp the sentiment across the top.


Dress it up with a 1/8" Gold Ribbon.  I used about 8 inches to tie the knot and then trim off the ends at an angle.  Attach the white to the gold with a strong adhesive.  Keep in mind the gold is a bit slippery, so I used the Fast Fuse so it would stick nice and strong.

Pop some Dimensionals behind the banners and attach to the top lined up with the DSP.


I love the shiny look of the Gold Foil peeking out behind the Whisper White.


Stamping Tip:

To get the very best stamping from your Photopolymer Stamps, always use the Pierce Mat underneath for a crisp clean image.

Thank you for looking in today ~ may you have a Blessed Sunday.

~ Donna

If you are reading this in an email, be sure to go to my blog to see the scrolling store below.


Built for Free Using: My Stampin Blog

Thursday, July 9, 2015

Sponged Emboss Resist with Garden in Bloom

I picked up this technique from Angie Leach.  I added some ribbon and changed up the sentiments as well as the measurements, but the technique is what makes the card.  Thank you Angie!  Great fast, fun card!


Recipe:
Base:  Whisper White - 8 1/2" x 5 1/2", scored at 4 1/4"
Mat:  Island Indigo - 5 1/8" x 3 7/8"
Top:  Soft Sky - 4 7/8" x 3 5/8"

Mat:  Hello Honey - 5 1/8" x 3 7/8"
Top: So Saffron - 4 7/8" x 3 5/8"


Play with different color combinations to see what you like.  These are the two I have so far.

Begin with your lightest color and stamp the outline flower from Garden in Bloom with VersaMark and then use our White Embossing powder and heat gun to set up the powder.
Tip from Angie:  For even spacing, stamp the images across the card stock diagonally, then fill in the outer edges following the same diagonal slant.

For the Soft Sky / Island Indigo card begin by lightly sponging the Soft Sky into the petals, then add Island Indigo to the centers and just the inside centers of the petals.  I used our Sponge Daubers for easy sponging.


For the So Saffron / Hello Honey cards, I used So Saffron ink and Delightful Dijon for a darker inside.

To make the banner, I used a one inch strip of Whisper White and punched the end before stamping my sentiment.  I wanted just a small border, so I cut another strip of 1 1/8".  The next size on the Banner Punch is 1 1/2" but all you have to do is center your strip between the markers and you'll be just fine.


Thank you for looking in today!  Have a Happy Thursday!

~ Donna


Built for Free Using: My Stampin Blog

Friday, July 3, 2015

Garden in Bloom Friends

This Garden in Bloom set has to be one of my favorites and I can't wait to use it with all the beautiful colors we have!


Recipe:

Base:  Rose Red - 8 1/2" x 5 1/2", scored at 4 1/4"
Layer:  Basic Black - 5 1/8" x 3 7/8"
Top:  Whisper White - 5" x 3 3/4"


I first stamped the solid flower first with Rose Red and the solid leaves with Old Olive.  The center of the flower is Crushed Curry.

After they dried I stamped the outlines to match the flower and leaves with Memento Black Ink.  The bee is also stamped with Memento Black Ink and then colored in with the Crushed Curry Stampin' Write Marker.  Then I used the Basic Black Stampin' Write Marker to draw the "flight" of the bumble bee.

Get ready to see this card in other colors!  I'm going to be experimenting with everything that makes a beautiful flower!  Calypso Coral is next!


Don't forget to decorate the inside as well.  I thought the cute little bee would be a good stamp to put inside.  So cute!


Thank  you for looking in today.  I hope you have a fabulous and safe 4th of July weekend!  Three days off for this girl!  Wooo Hooo!

~ Donna


Built for Free Using: My Stampin Blog

Sunday, June 28, 2015

Happy Happenings in a Garden of Bloom

I just love this Garden in Bloom set.  Today I've used them without the "inside" stamp and I think it's just simply beautiful!  I made two cards with different measurements.


First Card Recipe:

Crushed Curry Base:  8 1/2" x 5 1/2", scored at 4 1/4"
Whisper White:  5 1/4" x 4"
Crushed Curry:  4 1/2" x 3 1/4"
Whisper White:  4 1/4" x 3"


Inside:
Whisper White:  5 1/4" x 4"
Cherry Cobbler Strip:  5 1/4" x 1"
Whisper White Strip:  5 1/4" x 3/4"


Second Card Recipe :

Crushed Curry Base:  8 1/2" x 5 1/2", scored at 4 1/4"
Whisper White:  5 1/4" x 4"
Crushed Curry:  4" x 3"
Whisper White:  3 3/4" x 2 3/4"


Inside:
Whisper White 5 1/4" x 4"
Cherry Cobbler Strip:  4" x 1"
Whisper White Strip:  4" x 3/4"


Don't forget a little envelope love too!  I placed a post-it note over the front of the envelope so that I could easily stamp "off" the edge and then remove the post-it for a clean envelope.

I even added a little love to the front of the envelope.


Thank you for looking in today.  May you have a Blessed Sunday!

~ Donna


Built for Free Using: My Stampin Blog

Wednesday, June 24, 2015

English Garden in Bloom

As promised, here are some more cards using the beautiful English Garden DSP.  The basic idea for this card comes from Connie Collins.  Thank you Connie!  Her card uses Blackberry Bliss and a scalloped edge which is very pretty.

I chose to use Melon Mambo for my mat color and I didn't use a scalloped edge or stitches.  This card is going to be another one of my favorites!


Even the inside is decorated.  I must remember to do this more often.  I love having the inside looking beautiful too!


Recipe:

Mossy Meadow - 8 1/2" x 5 1/2", scored at 4 1/4"
Melon Mambo - 5 1/4" x 4"
DSP - 5 1/8" x 3 7/8"
Whisper White (inside) 5 1/8" x 3 7/8"

Sentiment Inside and Out:  Garden in Bloom
Ink:  Soft Suede for sponging the edges of the DSP and Circle
Mossy Meadow for Sentiments


Since I didn't want to do stitching, I made my own "stitch" with my Soft Suede Stampin' Write Marker.  I only did this around the 2 1/2" Circle.


Remember, if you are reading this in an email (exactly how many of you are reading from an email?  I'm curious - post a comment and let me know, please?) - if you are, remember to go to my blog link below to see the "scrolling store" from "mystampin'blog" website.

Thank you for looking in today.  Happy Hump Day!

~ Donna

Built for Free Using: My Stampin Blog

Tuesday, June 16, 2015

Garden in Bloom - Updated and Shiny!

This is an updated version of a card I made and posted last Thursday, June 11th.  You can see it HERE.

On the first card, I had to wait all night long for the black Memento ink to dry on the vellum card stock.  Well, I fixed that problem here by stamping with VersaMark and using Black Heat Embossing Powder.

The trick here is being sure to use your Embossing Buddy first so that you don't have stray bits of powder melted onto your card (I'm getting better at remembering where I put that little bag).  When using the Heat Gun with Vellum card stock, you must do so very slowly and carefully.  DO NOT get the heat too close to the Vellum.  It will ruin your paper and your day! 

Once the powder has properly melted onto the Vellum, let it sit and cool before you attempt to touch it.  It will smear if it is still warm.  This should only take a couple of minutes.  Nothing like my first post!  Yayyyy!


Pretty!  Don't you think?


Thank you for looking in today.  

~ Donna

Thursday, June 11, 2015

Catalog Casing - Garden in Bloom

My first order of fun from the catalog arrived today (Wednesday) and after I sorted out the workshop from Saturday I started to play with one of my new stamp sets, Garden in Bloom.

This is a great two-step set with outline stamps and filler stamps.  For this card I just used the filler stamps.  The card I CASEd this from is on page 119 of the catalog.  It isn't exactly the same simply because I just wanted the concept and not exact.

I used Daffodil Delight for the lighter color on the flowers and Delightful Dijon for the darker part.  HEY, I just realized both of those yellow's have "Delight" in them... how did I miss that before?  Please tell me I'm not alone there.

The base card is Delightful Dijon, then stamped on Whisper White and covered with Vellum.  On top of the Vellum I used Memento, but I think I may try StazOn next time and possibly embossing powder.  I know ink doesn't dry well on Vellum, but I had to give it a try.


If you look closely at the stamps, you'll see a little pointer that will help you line up the outline with the inside.  So, when you stamp, be sure to place the pointer in the same place on your block for each stamp.  Since they are Photopolymer, you may not need to do this as you can see through the block and stamp, but this will help you line it up if you like it a bit more precise.


Thank you for looking in today.  

~ Donna


Built for Free Using: My Stampin Blog

Contributors