Showing posts with label Tutti Frutti DSP. Show all posts

Monday, April 23, 2018

Big on Birthdays for a Little Longer

Here's another stamp set that will be retiring that I simply haven't used enough.  Wonderful BIG greetings that really make a card stand out.  Time to make some big beautiful cards.


Recipe:
Whisper White Thick Cardstock - 8 1/2" x 5 1/2", scored and folded at 4 1/4"
Tutti-Frutti Designer Series Paper - 5 1/4" x 4" (then cut to 5 1/4" x 1 3/4" and the remainder will be 5 1/4" x 2 1/4") 
Tutti-Frutti DSP - 4" x 1/2" (inside)
Bermuda Bay - 4 3/4" x 3"
Whisper White - 4 1/2" x 2 3/4"

Stamps:  Big on Birthdays
Ink: Bermuda Bay

Ribbon:  Calypso Coral 1/8" Sheer Ribbon - about 18 inches to wrap 3 times and a separate piece tied into a bow and attached with a glue dot.


Thank you for looking in today.  Have a great week!

~ Donna


Product List

Monday, February 19, 2018

Tutti-Frutti Meets Lemon Zest

With the crazy warm weather we are having in Phoenix, it won't be long until the citrus trees start to blossom around here, so I thought it would be fun to dig out the Lemon Zest and the great citrusy paper in Tutti-Frutti.


Recipe:

Whisper White Thick cardstock - 8 1/2" x 5 1/2", scored and folded at 4 1/4"
Basic Black - 4 3/4" x 3 1/2
Tutti-Frutti Designer Series Paper - 4 5/8" x 3 3/8"
Basic Black - 4 1/8" x 1 3/8"
Tutti-Frutti - Designer Series Paper - 4" x 1 1/4"
Whisper White - Stitched Shapes
Basic Black - Layering Circles

Stamps:  Lemon Zest
Ink: Peekaboo Peach


Inside I decided to layer up with more color and add another piece of the pretty Tutti-Frutti DSP

Tutti-Frutti - 5 1/4" x 4"
Whisper White - 5" x 3 3/4"

I also added a strip of leftover Tutti-Frutti.

Don't forget to dress up the envelope flap!


Thank you for looking in today!  Remember to fly your flags today - It's President's Day!

~ Donna

Sunday, January 28, 2018

Side Panel Fun Fold - Take Two

It was pointed out to me that I didn't really show how yesterday's card opens, at least not clearly, and I had to agree!  So, here are a couple of new views.


To open the card you first lift the small strip to the left, then the DSP panel to the right, then inside is open for writing or a sentiment stamp.  Remember though, when you write inside to keep your writing under where the panel will cover it up when closed.


Then, because I liked how it turned out, I decided to make some more with the same paper stack, but with a different base color and DSP.


I also made a change to the strip.  Measurements are the same as before (5" x 1", scored at 1").  Slide the strip of cardstock into the Pretty Label Punch.  Pull it back towards you so you can see the end of the paper and then slide back in "just enough" to be close to the end. 


Do the same for the DSP strip below.


Here is the open view... didn't want to miss it again!  :)


Thank you for looking in today, even if it is a re-work from yesterday.  I really wanted to share the how pretty this can be with other colors and papers!  See yesterday's post for full details HERE.

Have a Blessed Sunday!

~ Donna


Product List

Saturday, January 27, 2018

Side Panel Fun Fold

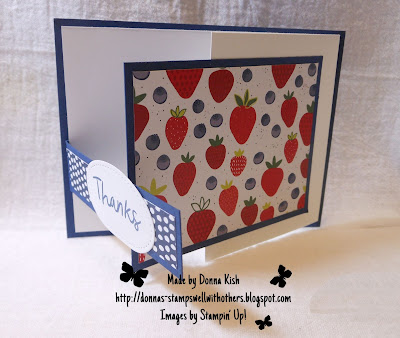
It's time to add some more Thank You cards to my collection.  I've been wanting to use this pretty Strawberries and Blueberries card from the Tutti-Frutti Designer Series Paper.  The fold pattern and dimensions comes from LeeAnn Greff - Thanks LeeAnn - I love your great ideas!


Here are the measurements and pieces you will need:


Night of Navy Base - 5 1/2" x 4 1/4"
Whisper White - 8 1/2" x 4", scored at 5 1/4"
Night of Navy - 4 1/4" x 3 1/4"
Tutti-Frutti DSP - 4" x 3"
Night of Navy Strip - 5" x 1", scored at 1"
Tutti-Frutti DSP - 3 3/4" x 3/4" (the one used is the back side of the strawberries & blueberries)
Whisper White scraps for sentiment


You can begin by attaching the DSP to the small Night of Navy Panel (above) and the small strip of DSP to the strip of Night of Navy.


Attach the 1" portion of the strip to the back of the Whisper White card.

Fold over and put a good crease on the fold with your bone folder.

Now you can attach the folded Whisper White to the Night of Navy panel.

Here's the tricky part.  Ask me why I say that, go ahead, ask... LOL

When you are ready to attach the small panel to the front of the card, remember that you only want adhesive on PART of the panel - the part that is on the Whisper White that opens.  Here's a good way to add the glue.

Lay your panel face down - being sure that if your pattern needs to face a specific direction that it is facing the right way for where you place the adhesive.


Then add your adhesive of choice, I always prefer liquid Tombo.  Flip it over and adhere it centered within the Whisper White behind it.


Add your sentiment and  you're done.  I used the Stitched Shapes ovals for my sentiment and the "Thanks" comes from Thankful Thoughts.


Thank you for looking in today.  It's finally Saturday!

~ Donna


Product List

Contributors