Wednesday, January 31, 2018

Missing in Action

Missing in Action here.  It will probably be a couple of more days before I post again, simply because life has gotten in the way.  On Monday night, my boys lost their father to cancer.

Don't give up on me though.  I'll be back after a little break with some fun new cards.

Remember, today is the last day to order with the January Host Code.  Watch for your gifts to arrive in the mail if you made a qualifying order.  See side margin on the blog for the current host code.  >>

I'll be posting a new February Host Code on February 1st!

In the meantime... here are a couple of pictures of my oldest son's wedding.  I love the look on their faces!  If you click on the picture, it should open in a new window and be bigger.

Mr. & Mrs. William A. White, II

Robert, Me, Billy
(My pride and joy!)

Will (the boys' Dad), Robert, Billy and Me.


Thank you for looking in.  I'll be back in a day or two.

~ Donna

Monday, January 29, 2018

Swap Card from Jennie

This is so lovely.  This is a swap from our Team Regional Meeting we had last weekend.  Jennie P. is the creator of this beautiful card.  I'm so glad she was in my swap group so I received one.


The stamp used is one of the Free Stamps from Sale-a-bration.  With every $50 spent (before tax and shipping), you can select a free item from the Sale-a-bration brochure.  Additionally, with that same $50.00 if you use the hostess code for January (before January 31st) you will also receive a free roll of Whisper White 1/4" Organza Ribbon directly from me.

Thank you for looking in today.  It's Monday, so here we go again!  Back to the office grind and then home to relax and hopefully stamp!

~ Donna


Sunday, January 28, 2018

Side Panel Fun Fold - Take Two

It was pointed out to me that I didn't really show how yesterday's card opens, at least not clearly, and I had to agree!  So, here are a couple of new views.


To open the card you first lift the small strip to the left, then the DSP panel to the right, then inside is open for writing or a sentiment stamp.  Remember though, when you write inside to keep your writing under where the panel will cover it up when closed.


Then, because I liked how it turned out, I decided to make some more with the same paper stack, but with a different base color and DSP.


I also made a change to the strip.  Measurements are the same as before (5" x 1", scored at 1").  Slide the strip of cardstock into the Pretty Label Punch.  Pull it back towards you so you can see the end of the paper and then slide back in "just enough" to be close to the end. 


Do the same for the DSP strip below.


Here is the open view... didn't want to miss it again!  :)


Thank you for looking in today, even if it is a re-work from yesterday.  I really wanted to share the how pretty this can be with other colors and papers!  See yesterday's post for full details HERE.

Have a Blessed Sunday!

~ Donna


Product List

Saturday, January 27, 2018

Side Panel Fun Fold

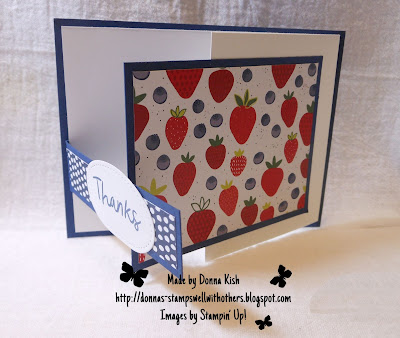
It's time to add some more Thank You cards to my collection.  I've been wanting to use this pretty Strawberries and Blueberries card from the Tutti-Frutti Designer Series Paper.  The fold pattern and dimensions comes from LeeAnn Greff - Thanks LeeAnn - I love your great ideas!


Here are the measurements and pieces you will need:


Night of Navy Base - 5 1/2" x 4 1/4"
Whisper White - 8 1/2" x 4", scored at 5 1/4"
Night of Navy - 4 1/4" x 3 1/4"
Tutti-Frutti DSP - 4" x 3"
Night of Navy Strip - 5" x 1", scored at 1"
Tutti-Frutti DSP - 3 3/4" x 3/4" (the one used is the back side of the strawberries & blueberries)
Whisper White scraps for sentiment


You can begin by attaching the DSP to the small Night of Navy Panel (above) and the small strip of DSP to the strip of Night of Navy.


Attach the 1" portion of the strip to the back of the Whisper White card.

Fold over and put a good crease on the fold with your bone folder.

Now you can attach the folded Whisper White to the Night of Navy panel.

Here's the tricky part.  Ask me why I say that, go ahead, ask... LOL

When you are ready to attach the small panel to the front of the card, remember that you only want adhesive on PART of the panel - the part that is on the Whisper White that opens.  Here's a good way to add the glue.

Lay your panel face down - being sure that if your pattern needs to face a specific direction that it is facing the right way for where you place the adhesive.


Then add your adhesive of choice, I always prefer liquid Tombo.  Flip it over and adhere it centered within the Whisper White behind it.


Add your sentiment and  you're done.  I used the Stitched Shapes ovals for my sentiment and the "Thanks" comes from Thankful Thoughts.


Thank you for looking in today.  It's finally Saturday!

~ Donna


Product List

Friday, January 26, 2018

Anniversary Slider

Just a few more days to use the January Host Code and receive a free gift of Whisper White 1/4" Organza Ribbon from me.  Purchase $50.00 (before shipping and tax) and I'll send you a free roll of ribbon.  PLUS since it's Sale-a-bration time, you can select free gifts from the Sale-a-bration catalog as well.


I was on a roll making the slider cards the other night, until I ran out of foam strips.  Ordered more today so I'll be ready next week when they arrive!

Here is another card I made for my hubby for our Anniversary.  He loved it!  


While I can't get the video to work on the blog, it does work on my Stamps Well With Others facebook page.  You can see the birthday slider there.  To see measurements for the Slider Card - check HERE.

This is short today, mostly because my head wants to go to bed.  Come back tomorrow for more!

Thank you for checking in!  happy FRIDAY!

~ Donna

Thursday, January 25, 2018

Happy Anniversary to a Special Pair

This card is for a special pair of people who celebrate their anniversary on the same day hubby and I celebrate ours.  Hopefully it has arrived in her mailbox (snail - mail - box) before she sees it on here.

To make the background I sprinkled yellow and orange Brusho very lightly onto the watercolor paper.  Then I spritzed it gently with one of our Spritzers and water.  I blotted the excess off with a tissue (kleenex) and then, because I didn't want to wait overnight, I used our Heat Tool to dry and flatten out (sort of) the watercolor paper.


Recipe:
Daffodil Delight - 8 1/2" x 5 1/2", scored and folded at 4 1/4"
Bermuda Bay - 5" x 3 3/4"
Watercolor Paper - 4 7/8" x 3 5/8"

Stamps - Dragonfly Dreams (outside) and Number of Years (inside)
Framelits - Seasonal Layers


Inside I added some of our new sequins that are already backed with adhesive!  How awesome is that!  They are in the Occasions catalog on page 29 - Tutti-frutti Adhesive-Backed Sequins.


Thank you for looking in today.  It's Friday Eve!  Yay!

~ Donna


Product List

Contributors