Showing posts with label Snow Friends. Show all posts

Friday, June 10, 2016

Snowmen... Arizona Style

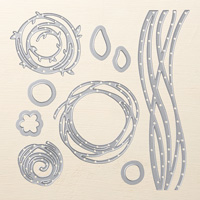
I spotted a snowman made from Swirly Scribbles Thinlits by Jessica Urrutia and immediately thought about how we make Snowmen in Arizona...  with Tumbleweeds!  So I pulled out some Crumb Cake cardstock and went to work!
 
 
Recipe: 
Base:  Whisper White Thick cardstock - 8 1/2" x 5 1/2", scored and folded at 4 1/4"
Brights Designer Series Paper Stack (Real Red Dots) - 5 3/8" x 4 1/8"
Marina Mist - 5 1/8" x 3 7/8"
 
Whisper White / Crumb Cake - Swirly Scribbles
Whisper White for stamping Scarf from Snow Place with Real Red ink.


Jessica's version used Whisper White, so I made one of those as well.  I believe Jessica cut off the little leaves off of the middle sized Swirl, but that just makes it look more like a tumbleweed and that's what I wanted, so I left them on.

I used just the "Christmas!" part from Merry Christmas! from the Snow Place stamp set and added my own handwriting at the end. 


Thank you for looking in today.   Be sure to click on any of the items below to shop for them in my store.

Don't forget to sign up for Paper Pumpkin if you've never tried it before... NOW is the time to try for only $5.00.  Use Promo Code:  ONEDAYDEAL and remember to select me as your Demonstrator.

This offer ends at 11:50 p.m. (MT) June 10th (that's TODAY!) so don't miss out!

Not sure what you can do with Paper Pumpkin?  Check out Paper Pumpkin Fan Club on Facebook.  So many ideas you'll want extra refills for  your kits to make more and more ideas!


Product List
Saturday, December 12, 2015

December Workshop Thank You's

Inspired by an adorable full sized thank you card from Lorri Heiling, I made my 3" x 3" for my customers from Sue's December workshop.

This is Lorri's card, isn't it adorable?


Here are the cards I made.


Recipe ~


Whisper White - 6" x 3", scored at 3"
Decorative Dots Embossing folder (I couldn't find my Softly Falling when I was working on these!)
Cherry Cobbler - punched with Note Tag punch
Dazzling Diamonds - die cut with the Small Snowman from Snow Friends Framelits
Basic Black - die cut the Top Hat from Snow Friends Framelits.

Whisper White - stamped with "thank you" from Teeny Tiny Wishes and punched with Word Windo Punch.
Rhinestone Jewel to decorate his hat.


I think these are just so cute!  Thank you again to Lorri for the much needed inspiration!

Thank you for looking in today.  Have a Blessed Sunday!

~ Donna


Built for Free Using: My Stampin Blog

Thursday, December 3, 2015

Snow Place Window Spotlight

This is an adorable card I have planned for this weekend's workshop.  There will be some new stampers there and I think this will be a nice easy card with lots of POP!  I'm CASEing this card from Angie Leach.  I've changed up the sentiment and added some extra glitter, but thanks go to Angie for this great design!


Recipe:
Whisper White Thick Cardstock for the base - 8 1/2" x 5 1/2", scored at 4 1/4"
Marina Mist 5 1/8" x 3 7/8" and rounded on the top with the Project Life Corner Rounder Punch.
Whisper White 5" x 3 3/4" and embossed with the Brick Wall Texture Embossing Folder

Punch a 2 1/2" Circle from the top down and centered on the Brick Wall.
Stamp the Penguin with Memento Black ink and the Scarf and Earmuffs with Cherry Cobbler.
Cut them out with the Snow Friends Framelits.
Color his beak with Pumpkin Pie, Tangerine Tango or Tangelo Twist.  I colored his feet too and then remembered they would be hidden!

It's hard to see, but I used the two way glue pen around the edge of the hole and sprinkled it with Dazzling Details glitter.


Pop the Brick Wall up with Stampin' Dimensionals, remembering not to put them where you want to put your Penguin.  I also put one Dimensional behind his head and then slid him into place with his Scarf hanging out.  I put 1/4 of a dimensional behind the earmuffs.


The banner along the bottom started out 3 7/8" x 1", stamped in the center with "there's snow place like home" and then used the Triple Banner Punch to make the bannered ends.  Remember if  you stamp before cutting the banner, that you will be cutting off 3/8" from the point on each side, so plan ahead.


I am SO excited about this weekend's workshop.  There's going to be a BIG surprise for me there, that is no longer a surprise (she just couldn't wait to tell me).  My very best friend Danita is coming up from Southern Arizona for the workshop.  This is a HUGE deal because her health really keeps her home most of the time.  I can hardly wait to see her.  It's going to be the best workshop EVER!

Thank you for looking in today.

~ Donna


Built for Free Using: My Stampin Blog

Friday, September 25, 2015

Time to Chill

Do you remember playing with paper dolls and how much fun it was to dress them up with different outfits and accessories?  I sure do and these little guys remind me of playing with those paper dolls and all of their accouterments. Don't you think they are adorable?

I've been stamping and die cutting penguins and accessories and tomorrow I plan to dress them up and put them on everything!  Ok, well, maybe not everything, but they will certainly be on so many cards!


The inside and outside sentiments are so perfect together. Add a few snowflakes on the inside and you can "Let It Snow!"


I stamped the penguins directly onto the Whisper White and then added the Softly Falling Textured Impressions Embossing.

The scarf, earmuffs, tie, hat and cane are all popped up with Stampin' Dimensionals.  The best thing about those little add-on's is they have Framelits Dies to go with them!  The Bundle saves you 15% when you buy Snow Place and Snow Friends together (140844)


Since the temperatures are still in the triple digits here, I thought snow on my cards would be a great idea!!

Thank you for looking in today!

~ Donna
Built for Free Using: My Stampin Blog

Wednesday, September 23, 2015

Halloween Penguins

I spotted this idea on, of all places, Pinterest, by Sheila Terlep.  Isn't that where we find so much inspiration.  As soon as I saw these adorable penguins dressed up for Halloween, I knew I had to give them a go!  I think it was the one with the purple hat and bow tie that caught my eye first.  I immediately thought of the old Batman cartoons and show with the Penguin.


Aren't they just the cutest little trick or treaters?  The red mask was made by die cutting the necktie that comes in the Snow Place / Snow Friends Bundle.  I then cut off the one side of the tie and attached it with adhesive so that it looks like it is tied around his head.

The "ghost" is made by simply cutting out the penguin without stamping first, then trim around the bottom so you can see his feet.  CUTE!


I made their trick or treat bags by just cutting a small rectangle of Sahara Sand and stamped them with the moon from Jingle All the Way.


Thank you for looking in today!  Have a wonderful Wednesday!

~ Donna
Built for Free Using: My Stampin Blog

Contributors
