Thursday, April 25, 2019

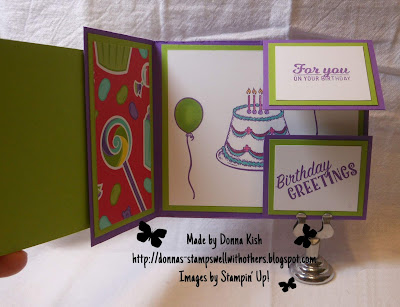
Dutch Door Fun Fold

I found this great "new to me" fold and wanted to share it with you.  This really comes together fairly quickly - the hard part is deciding the stamps you want to use.  I ended up using four different sets!  Yikes!

Dawn Griffith's video is where I found my inspiration.  I have all the measurements written below, but you will want to watch the video for how to do the base of the card.  It's very easy, but my brain may not explain it well enough.  


Recipe Measurements:
Base - Gorgeous Grape - 8" x 7 1/8" - see video for scoring and folding (beginning at the 10:48 mark).

Whisper White:
3 3/4" x 3" - front panel
4 1/4" x 3 1/2" inside panel
1 7/8" x 1 1/2" (cut four) small panels

Granny Apple Green:
4" x 3 1/4" - front panel
4 1/2" x 3 3/4" - inside panel
2 1/8" x 1 3/4" (cut four) small panels
3 3/4" x 2 1/8" (cut 2) inside and outside vertical panels

Designer Series Paper - How Sweet It Is
3 1/2" x 1 7/8" (cut 2) inside and outside vertical panels


Stamps I used:
Birthday Delivery
Blow Out the Candles
Playful Backgrounds
Sweetest Thing


Stamp, Color and Assemble.  Isn't that fun!?


I'm going to be playing with this fold for some other ideas - hopefully with less stamps, but this was a late night adventure after dropping the Graduation Owls and Stamps off to Meghan.  She really loved them and I'm so happy we made them for her.  It made my day as much as it made hers I think.

Thank you for looking in today - it's Friday Eve!

~ Donna

Wednesday, April 24, 2019

Clearance Rack Refresh and a Little Owl

The Clearance Rack has been updated!  Shop now for die sets, punches, embellishments, beautiful papers, ribbons and ink with big discounts of up to 60%.  These prices are while supplies last so don't miss out on your favorites!

Shop my store HERE.  Remember to shop using the host code VNS7924N and if you spend $50.00 or more using that code, I'll send you a gift of Metallic Pearls.


AND NOW... THE LITTLE OWLS...

So, I met a nice young lady who will be graduating next month from High School and when she asked me if I had anything she could add to her Graduation Invites, I came up with a retired set that I've been holding on to because I love the little graduation cap!  I'm going to loan it to her to use and found a retiring color of ink that should work pretty well for her school colors.  I also showed her samples online of these sweet little graduation owls and told her I would try to make some for her.  


Well, here they are!  Aren't they cute!?  Yes, everything there is retired, and I can't help that, but I just wanted to show them to you.  The school colors are Green and Gold, so I made the "cap and gown" out of Call Me Clover and the "diploma" out of copy paper that was as close as I could get to a nice golden color.  I checked their high school website for the real colors and these match pretty well.

We will be dropping these off tonight.  I can't wait to give them to her!


Happy Hump Day!!  

Thank you for looking in today... Happy Shopping!

~ Donna

Tuesday, April 23, 2019

April 2019 - Paper Pumpkin

This has to be one of the prettiest Paper Pumpkin kits that I've ever seen!  I absolutely LOVE it!

Look at these gorgeous cards and all I had to stamp was some sentiments (included in the kit), the flower and the leaves of the flower.  Easy Peasy!


It even comes with a nice acrylic box that will hold all the cards and envelopes from the kit so you can gift the completed cards to a friend or family member.


The May Paper Pumpkin Kit is scheduled to be another beautiful one.  May's kit will be inspired by Shelli Gardner and from the sneak peeks I've seen, I see it being another keeper!

I'd love you to sign up for Paper Pumpkin with me as your Demonstrator, simply click HERE to sign up or subscribe today.  Be sure to do so by May 10th in order to get Shelli's Kit.

Thank you for looking in today!

~ Donna

Monday, April 22, 2019

Little Leftovers

In order to get all the chocolate that taunts me out of the house, I threw these together on Saturday afternoon and then took them to one of our favorite pizza places - Venezia's.  They make a wonderful Pizza Bowl (no crust) that I love and they have Cauliflower Crust pizza, also fabulous.

We went early in the afternoon before the crowds which gave us a chance to visit with a couple of our favorite workers there and to give them a little treat.  Of course, that early in the day and the day before Easter, not all of the usuals were there, but that was okay.  It was nice!


I used our 2" x 8" Cellophane Bags and A Good Day stamp set  (retiring!!) with the bunny, of course, and then just simply colored the bow with Highland Heather or Flirty Flamingo.

The bunny is punched out with the 1 1/8" Scallop Circle and Highland Heather with the 1 3/8" Scallop Circle.  

Since I stapled the bag closed and I didn't want anyone getting snagged on the staple, I punched a second Highland Heather Scallop and attached it to the back.  Both were attached to the bag using Tear & Tape.


Handing these out even found a possible future stamper!  One of the young ladies is graduating from High School next month and was hoping for something to stamp onto her envelopes to make it fun.  Thankfully I still have one of the old graduation sets that has the Mortar Board stamp.  I'm going to take that to her on Wednesday with a retired ink pad that I think will match one of her school colors.  I think she'll love it!


I hope you had a Blessed Easter with family and friends.

~ Donna


Sunday, April 21, 2019

He Is Risen!

Wishing you a very Blessed Easter!


God bless you and your families!

~ Donna

Saturday, April 20, 2019

Thank You from the Flowering Desert

Being from Arizona, I was so thrilled when I saw this stamp set and now I'm so sad that it isn't carrying over into the next catalog.  It will probably be one that will stay in my collection, simply because it just screams Arizona Desert!

If you want to get your hands on the Flowering Desert, be sure to order it before too long.  Stampin' Up! will continue to make stamps through May 24th (I believe), but I wouldn't wait that long if I were you.


Recipe:
Poppy Parade - 5 1/2" x 8 1/2", scored and folded at 4 1/4"
Basic Black - 5 1/4" x 4"
Sahara Sand - 5 1/8" x 3 7/8" (See what I did there?  Sand... desert... LOL)
Whisper White - 5 1/4" x 4" (inside)


Stamps:
Flowering Desert (retiring)
Waterfront - Mountains, Desert, Sun
Abstract Impressions - Sentiment (bundled until June 3rd)

Ink:
Soft Suede
Mossy Meadow
Poppy Parade
Daffodil Delight


Thank you for looking in today.  Looking forward to a nice day today.

~ Donna


Product List

Friday, April 19, 2019

Happy Tails Wagging on

I'm so happy to see that this set is carrying over to the next Annual Catalog.  So many cute uses for it and so many friends with dogs to send some happy cards.

Today's card is CASEd from Mary Fish.  


Recipe:

  • Whisper White Thick Cardstock - 5 1/2" x 8 1/2", scored and folded at 4 1/4"
  • Whisper White Thick (I used the other half of the 8 1/2" x 11" cut to 4 1/4" x 5 1/2"
  • Neutrals 6" x 6" Designer Series Paper - cut to 2 7/8" tall - add to one of the pieces of Whisper White - run through the Big Shot with the Rectangle Stitched Framelits - 3 3/8" x 4 3/4" frame
  • Whisper White Thick - (the other piece from above) run through the Big Shot with the 2 1/4" x 3 1/2" Rectangle frame.
  • On the small piece of die cut Whisper White, stamp the sentiment from Happy Dog in the corner.
  • From the remaining DSP - punch the Happy Tails Dog, add Stampin' Dimensionals and add a Real Red heart also from the same punch.
  • I used Copper Trim for his collar and 3/8" Mixed Satin in Real Red to wrap around the white / striped piece.
  • Attach the dog attach under the sentiment.


The Copper Trim really looks nice for the collar, don't you think?


Clearly, I need a different color background for taking pictures of cards made with Whisper White!


Thank you for looking in today!  Happy Friday!

~ Donna Product List

Contributors